I did a video on configuring Neovim on Linux to make it work like Visual Studio while doing .NET development. You know, intellisense, that nifty break point based debugging, the code refactoring options and everything else that you get with Visual Studio or Visual Studio Code, but only with Neovim on Linux.
My point? The OS space and the IDE space has been democratized. It’s a level playing field between companies and developers now have complete choice. Like vim or neovim for than Visual Studio? You don’t ‘have to’ use Visual Studio to do .NET Development. When that happens everyone wins, because having the freedom to choose, is a good thing.
Some folks who saw that video remarked that they love the idea of using neovim as a powerful IDE but aren’t ready to switch the OS and move completely to Linux yet. Like I said, the OS space is democratized. So if you want to mix and match and do .NET development on Neovim and still use Windows as your operating system, power to you. This post will give you some pointers in that direction.
You start by installing Neovim on Windows from here.
Like Linux you now have package managers in windows. Neovim is available both on chocolatey and winget so whatever package manager rocks your boat, you should be able to install neovim using a single command. Instructions here.
Unlike Linux, the neovim initialization file in windows is @ C:\ Users\ [Your_User_Name_Here]\ AppData \Local \nvim \ init.vim (without the spaces).
The file for my configuration on windows 11 is here. You can download it, tweak it and place it in the folder above to quickly configure your neovim. Don’t forget to do a “:PlugInstall” to install all the plugins configured in the file automatically.
I’ll not cover the different components you need for .NET development on Nvim. This video already covers that. Let’s just focus on the changes when it comes to windows.
You’ll probably need to install python for Nvim for some of the plugins to work. You do that by installing python, pip and then doing:
pip install neovim
Once you do that, most plugins that depend on python should work.
Strangely enough, unlike Linux, McAfee on windows sees FZF as a virus and blocks it. I let the guys at FZF know, turns out they have worked on getting this whitelisted, but McAfee continues it’s little quirks; so your milage might vary. For me McAfee still has an issue and because my organization enforces McAfee, I had to move to ctrlp for searching files. The overall idea is the same, Fuzzy search for file names.
Then, I had to strip out Ag, because there seems to be no support for Ag on windows. The documentation for using Ag in windows is practically non-existent. So fuzzy search inside files is a problem and doing “search in entire solution” (like I often do in visual studio) is hard. We have to tackle this separately using something else. Enter Ack.
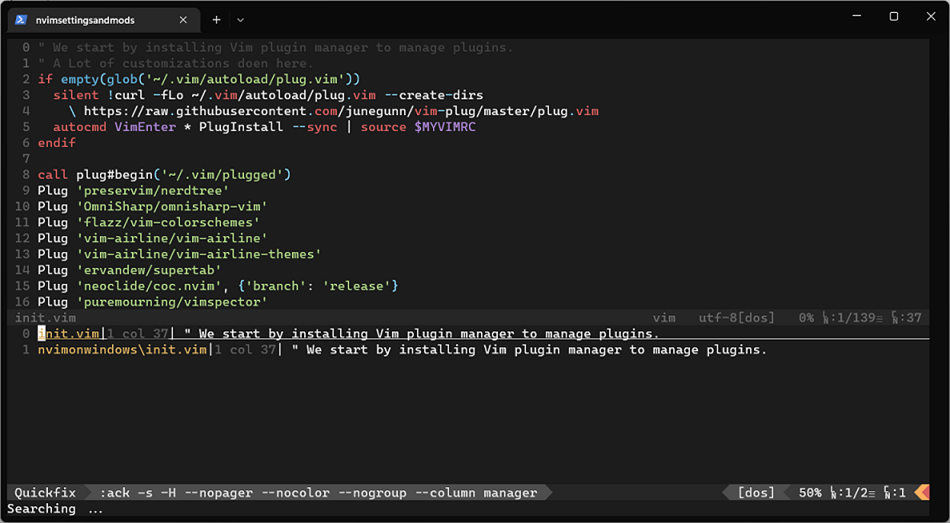
The plugin installation for Ack is here and the ack installation is here. The URLs have detailed instructions on how to install for windows. You have to install Perl for this to work if you don’t have that already. Once the Ack Plugin is installed you should be able to Fuzzy search contents inside all files in your current folder or solution by doing Ack [search_term]. For example below I am doing a search on the word manger inside my entire codebase using
:Ack manager
I see the line items (with files names) where the search item was found and I can navigate to each of the search result by using my arrow keys and preview it using enter / return key.
So far if you’ve followed my entire series of videos on this topic and used my configuration file you should be able to write .NET code on neovim inside of windows. You should have full intellisense, code refactoring options like you have in visual studio, fuzzy logic based file navigation, fuzzy file search and even debugging.
Oh, and don’t forget to get a nice nerd font with ligatures to make that console and your Neovim based IDE prettier.
Again, if you haven’t seen the full video series on dotnet developing using neovim, I highly recommend you watch that here. Rest of the steps for setting up neovim as the IDE for .NET are the same in windows even though the videos use Linux.
With just the tiny tweaks described in this post .NET Development using Neovim pretty much works, even on Windows. All the richness of C#, familiarity of Windows and the productivity of Neovim. Enjoy.

Comments are closed.