Beautiful IDEs and Developer Productivity tools are my weakness. Which is why when PowerShell was released back in 2006, the first thing I wrote about was how you can skin it and make it look beautiful. But that was 2006. Things have changed now and Microsoft is taking the cosmetics of your terminal pretty seriously. Add to that a little bit of magic from the open source community and you can have really slick looking terminals now.
This is my diary of making my terminal beautiful on my work laptop. This is what we're trying to get to:
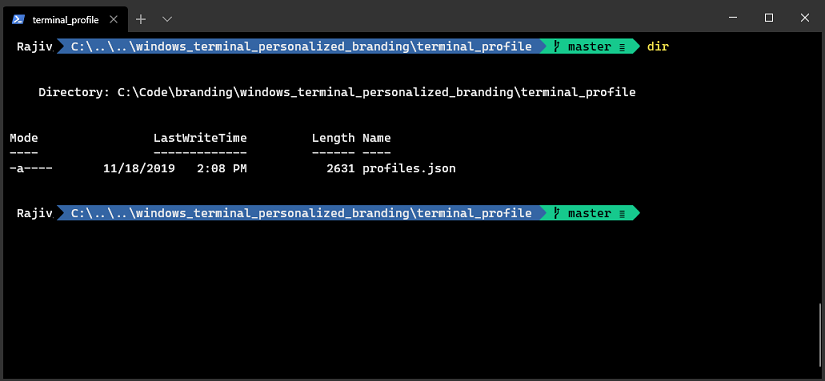
Let's start with first things first. We begin by getting the new Windows Terminal and then sprinkle a bit of open source magic on it.
Getting Windows Terminal
Windows Terminal is available in the Windows Store. You can search for "Windows Terminal" and you should see it there.
![]()
The Repository is available here. I had a slightly older version of windows 10 available so had to upgrade it before windows store would allow me to install the terminal. Oddly enough, if you don't meet the system requirements the Microsoft Store doesn't give you any visible attention grabbing error. The download link simply doesn't work. I am just about to give up when I see the tiny "See System Requirements" link (shown in the screenshot above). I click it the Microsoft Store tells me what the issue is:

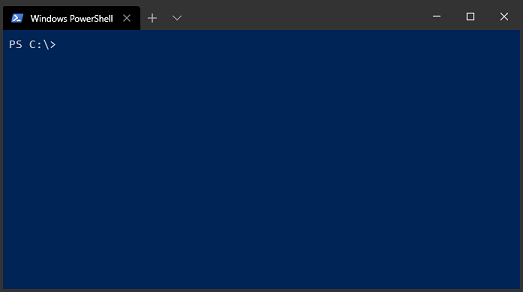
There is an upgrade button in the store which takes me here and that link lets me upgrade my windows to the version of windows needed. After upgrading windows to the required version I'm able to download and install the Terminal from Microsoft Store. I open the terminal after installing it and I'm presented with:
Installing Git and Oh-My-Posh + Posh-Git Modules
Most of the times when I am in the terminal I'm working on codebases and am on git repositories, so let's make the console pretty and also make it Git aware. We begin by installing Git for windows and then move to installing Oh-My-Posh and Posh-Git modules. The following comments install both modules:
Install-Module posh-git -Scope CurrentUser
Install-Module oh-my-posh -Scope CurrentUser
Modify Your Profile Script
Once you have fired the commands above you need to modify your profile. Type "Notepad $Profile" in the terminal and that should open a blank file for you. Add the following code into your profile:
Import-Module posh-git
Import-Module oh-my-posh
Set-Theme Agnoster
The "Agnoster" used above in one of the many other themes oh-my-posh provides you and you can pick the one that works best for you.
Installing the Right Fonts:
You need fonts that support Glyphs, without which the beautiful symbols that you see in the screenshot are nothing but ugly characters. To put things simply when people collectively agree that a bunch of character translate to a graphic we have a Glyph. Glyphs are useful because they allow you to represent a combination of characters with pretty looking symbols and icons.
You can choose from all the fonts here which already have glyphs patches inside them (or you can patch any font you like with Glyphs), but I'm just keeping it simple and using this one. From the link download "Delugia.Nerd.Font.Complete.ttf" and install it on your machine just like you would install any other font using your control panel fonts app.
Modify Your Profile settings, (JSON):
You can get you profile settings by clicking on the Down Arrow menu in the terminal and clicking on settings:
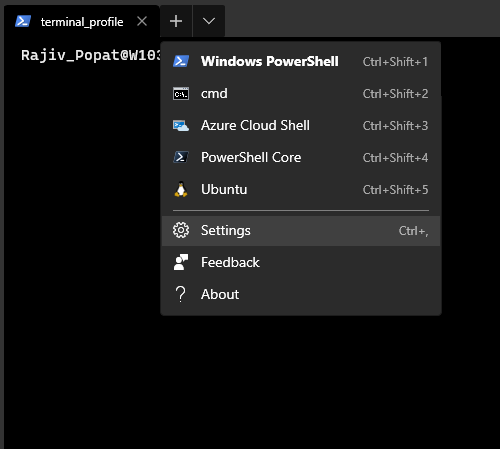
This should open up your profile file. There are a few aspects of the profile file worth understanding:
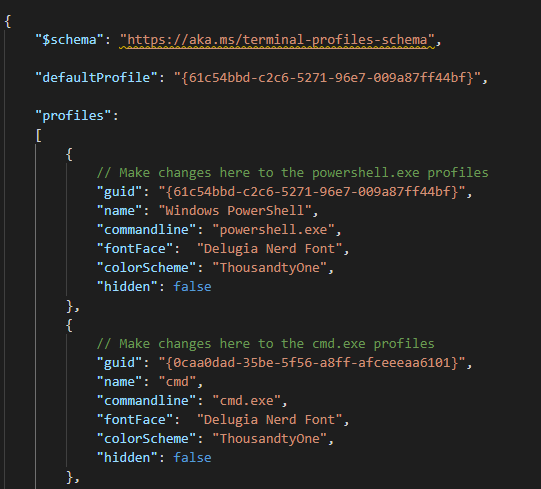
The profile file holds a collection of profiles. The 'defaultProfile' contains the guid of the profile terminal uses by default when you launch it. Here you will notice that the guid matches the guid of the profile called "Windows PowerShell". That starts PowerShell by default every time I start the terminal. If I wanted the terminal to start the Command Prompt I can replace the defaultProfile guid with the guid of the profile called "cmd".
Now look at the profile named "Windows PowerShell" in the screenshot above. The "commandline" tells the terminal which executable it should use. The Font Face tells it which fonts to use. Delugia Nerd Font is the font we just installed in the "Installing the Right Font" section of this post and that has Glyphs oh my post and post-git need already patched into it.
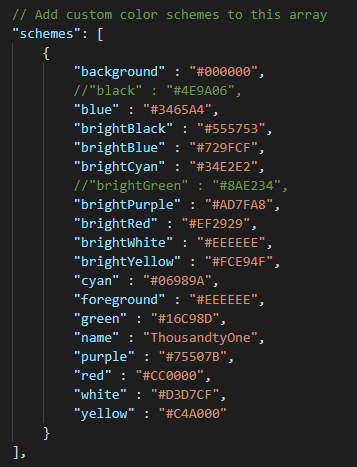
In the screenshot above I'm setting Delugia as the default font by setting the fontFace with the value 'Delugia Nerd Font' in all my profiles. The Color Scheme tells the terminal which colors to use. In the screenshot above, My Color Scheme is called "ThousandtyOne" and this is what it looks like:
If you want my entire profile you can grab my profile.json from GitHub here. If you've done everything correctly start your terminal and your terminal should now look like:
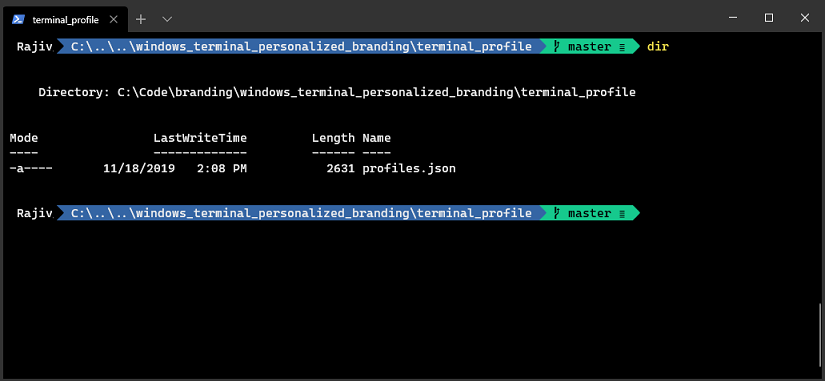
It's good looking and the fun part is, it's git aware. Notice the Git integration above. My git strip in the prompt, when I switch into a folder that contains git repository, looks green because there are no changes. Once I make changes the strip changes orange and shows me the number of changes right there in the command line:
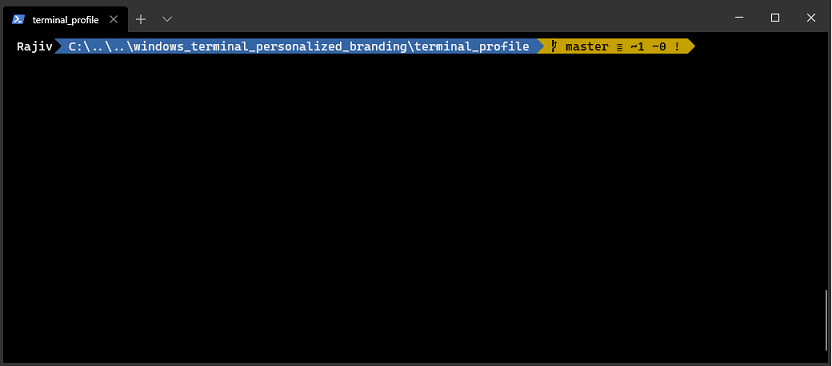
Note that all these colors are controlled by your color themes in the profile file so if you wanted different colors you could totally change the profile file to fit your needs and customize each theme.
I do realize that as far as Windows Terminal is concerned I'm a little late to the party. Here is an awesome post from Scott Hanselman on this topic. Think of this post as just my diary of the issues I faced and a customized version of the profile I am using for myself. If you're like me and spend a bulk of your time in command line it might be a good idea to get windows terminal and work with a CLI that is a little more good looking and slightly more git aware than what you get out of the box.
Go on, make your own gorgeous terminal now and share your profile with others. Time to have some fun with your terminals people!
Note: I did face an issue with not being able to save my profile cleanly with VS Code and VS Code kept complaining about conflicts with older version of the same file. When that happened the changes I made in the profile.json are not having an impact on the terminal. That's an issue with dirty write where if you get warnings about conflicts when you save your profile.json. This link contains a solution. The idea is that every time you have a conflict saving the profile isn't enough. You have to explicitly accept the changes. The link shows you a screenshot of how you can do that.
Comments are closed.